")


")
If you’re browsing Showit templates and considering a Northfolk template, I’m taking you behind-the-scenes to share 5 hidden features that you otherwise wouldn’t know about until after purchase — and that make all the difference in how your website performs.
Because, while yes — they check the usual Showit template “pros” boxes:
- Designer-quality websites without the custom price tag
- No code required
- The ability to launch within days
…this post isn’t about those things.
Are Northfolk Templates Worth It?
The short version is that yes, Northfolk templates are completely worth the higher price tag. And if you’re interested in buying one for yourself, code SIEVECOPY saves you 15%.
But I’m not here to just throw a discount code at you. I want to show you the true value of Northfolk templates.
The features you *won’t* find on the demo sites.
The hidden back-end details that support your SEO, prevent frustrating mistakes, and make customizing your template so much smoother.
How I Found Northfolk Showit Templates
As an SEO copywriter and Showit SEO specialist, I’ve bought my fair share of Showit templates. But my first wasn’t from Northfolk.
It wasn’t until after a client asked me to customize their Sunday template that I saw how thoughtful the Northfolk Co. gals (Sam + Rachel, btw) are when it comes to designing their templates — on the front end and in the back-end settings.
And while having the design part done for you is enough value alone for non-designers, it’s that attention to back-end details that really makes a difference in the ability to turn your template into a live website, quickly and stress-free.
And it’s those exact details that I wish I had known about when I was in the market to buy my first Showit template.
So, whether you’re a designer looking to better your own templates or a business owner weighing your options, here are 5 hidden features of Northfolk Showit templates that make them so dang worth it.
5 Hidden Features of Northfolk Showit Templates
01. Built-in Brand Guides
All Showit templates come with something called “Design Settings.” This is where you set your site’s colors, fonts, and button styles in the back-end of Showit.
But not every template designer sets these up in a way that’s easy for you, the end user, to swap in your own branding without the need to adjust every single element individually.
Here’s a photo of Showit’s Design Settings section for reference:
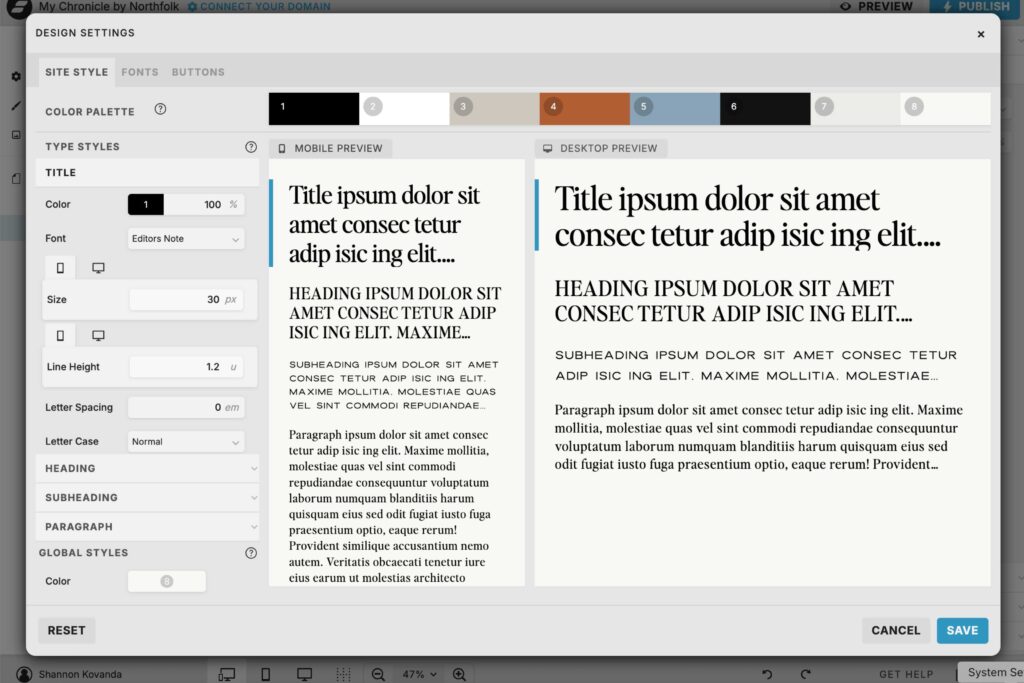
With some templates, you change a color in the design settings and… nothing happens on half your site. Now you have to hunt through every page, changing fonts and colors manually.
(Been there. Don’t want to do that again.)
Northfolk templates take a different approach. They use what they call “Brand Guides” to keep a clean, consistent system that connects the design settings to every element of the site. This means when you update your colors and fonts in one place, it updates everywhere automatically.
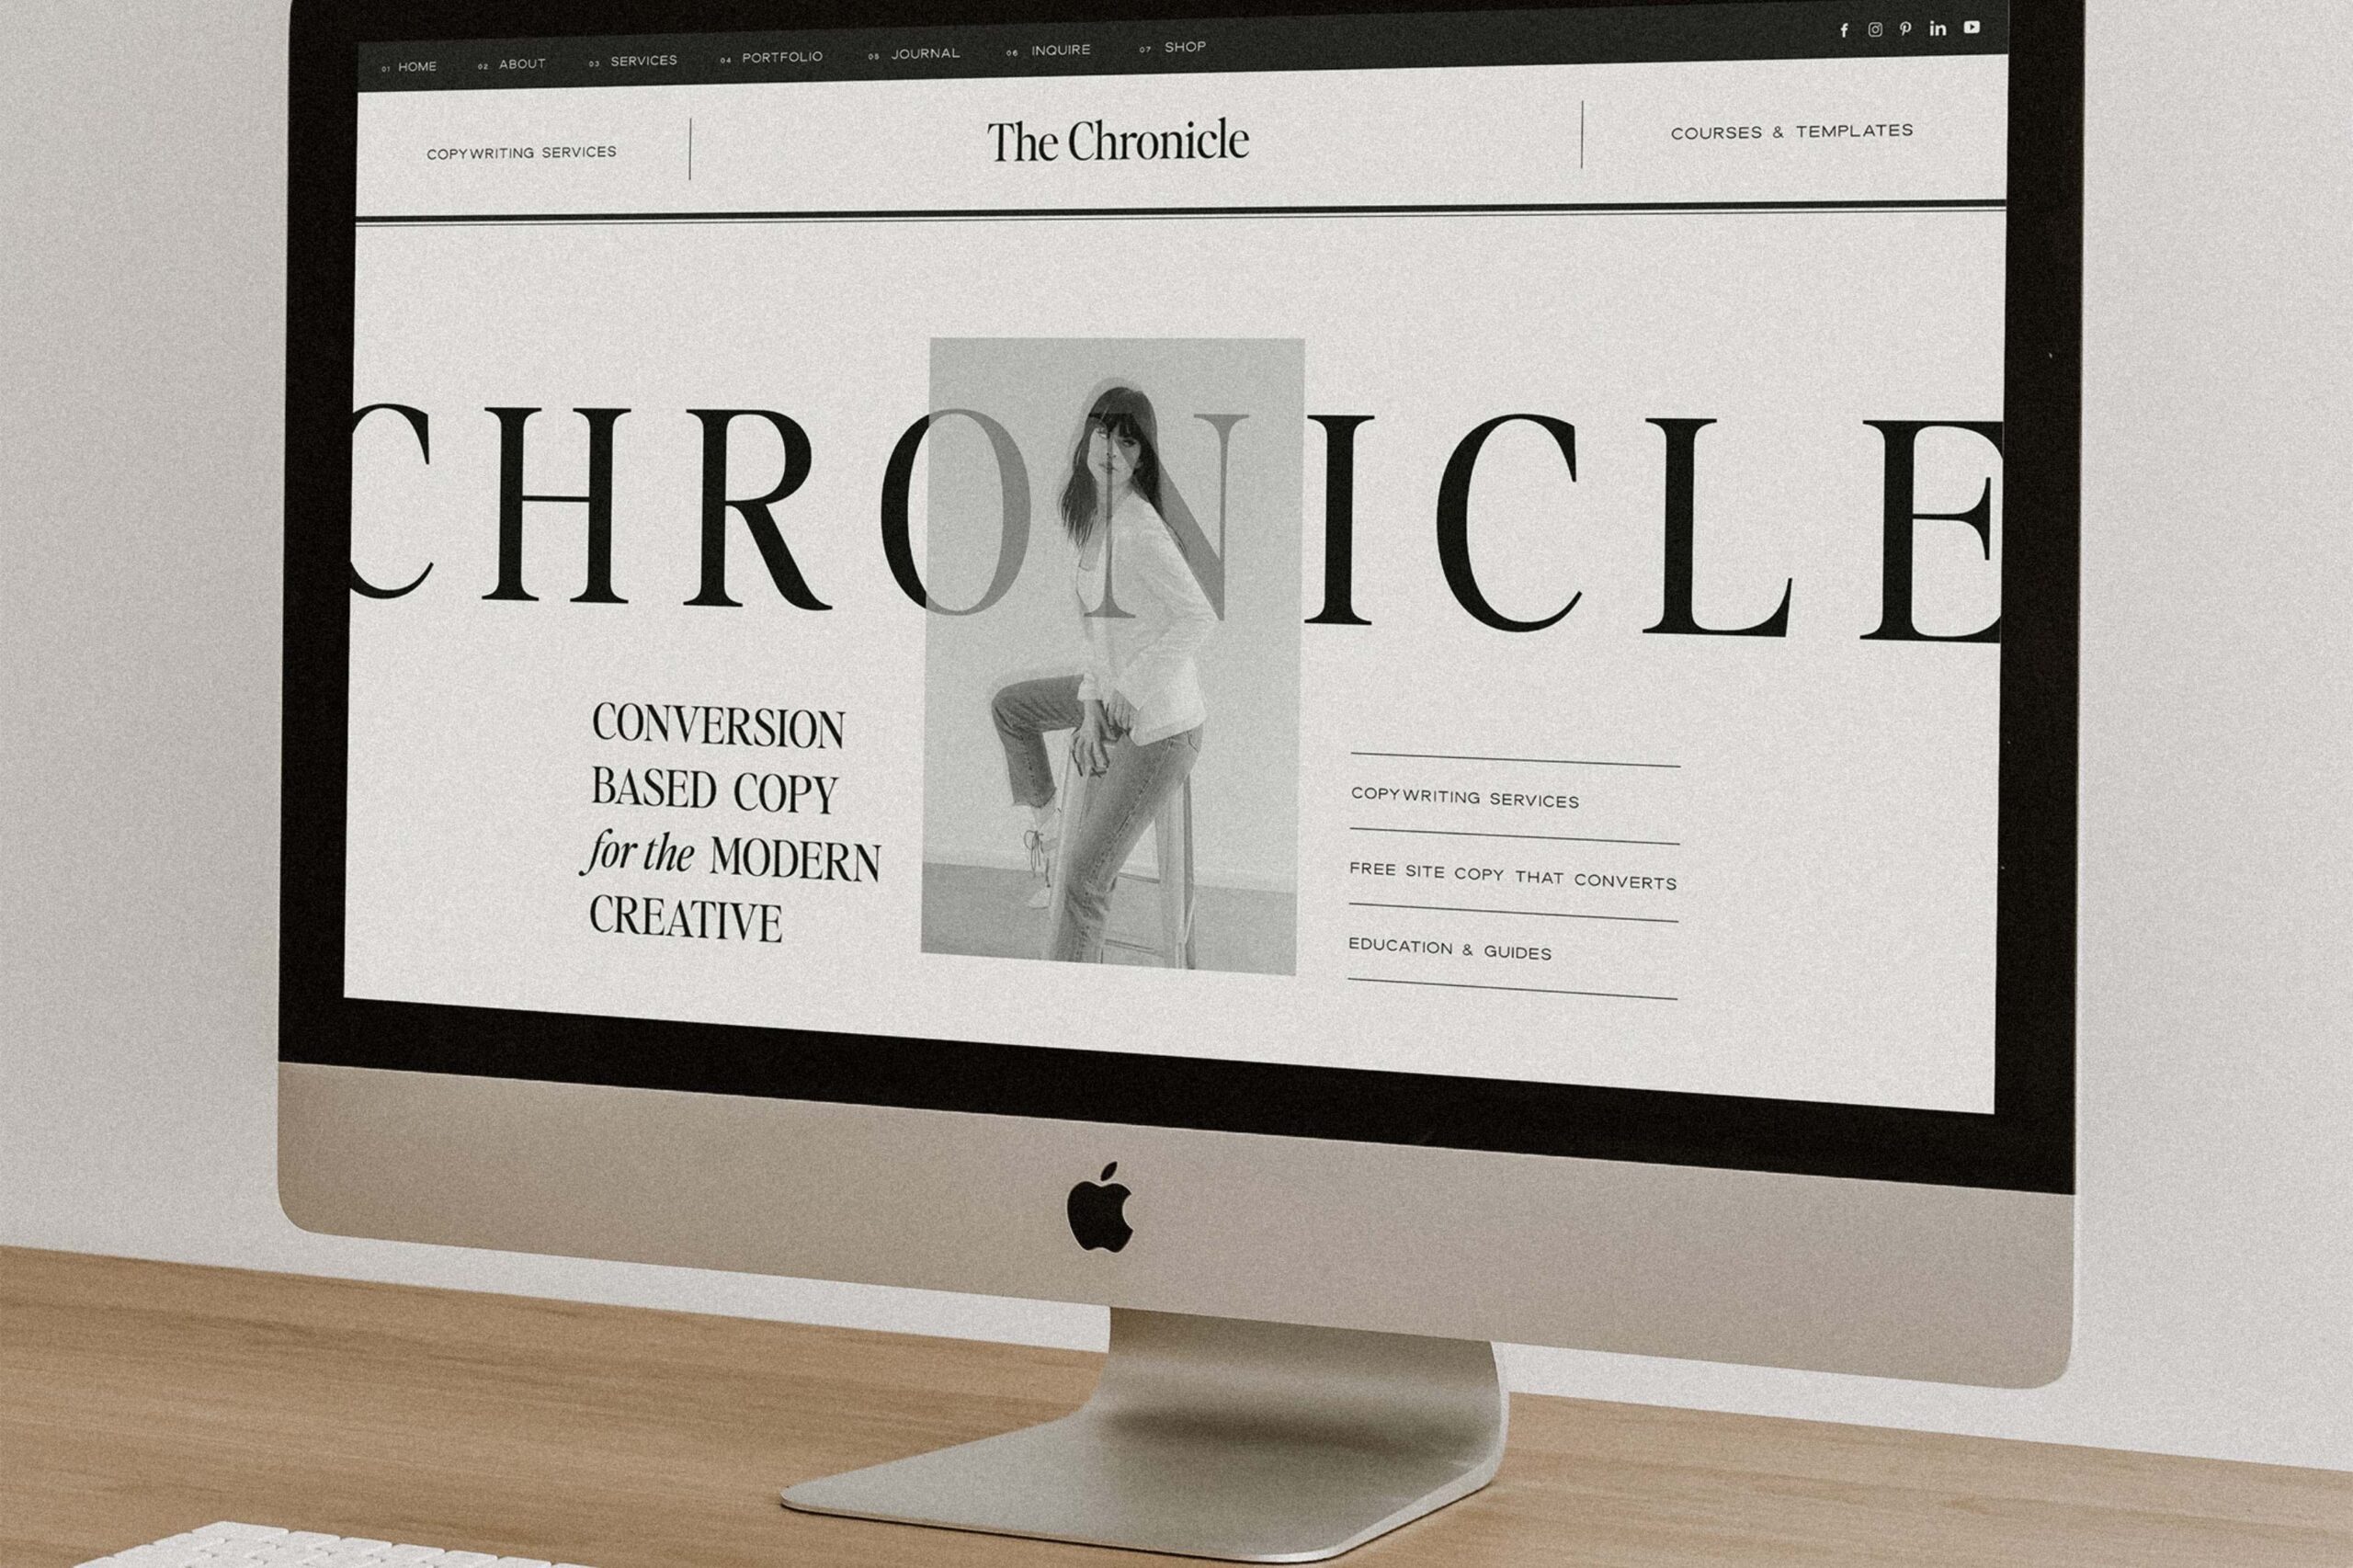
Here’s an example from their Chronicle template:
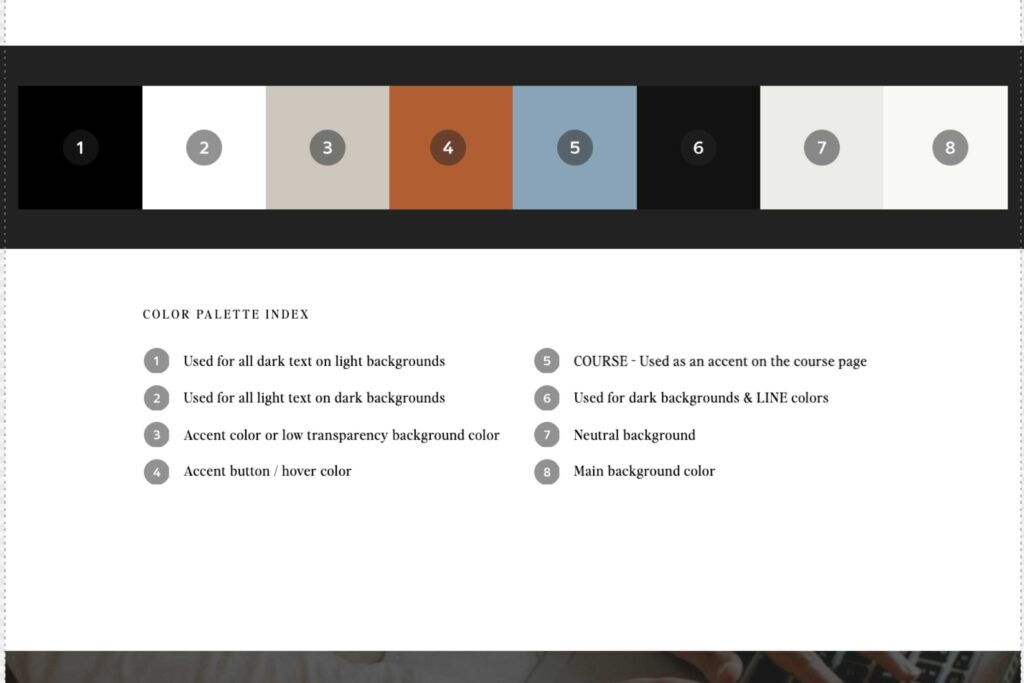
In this color palette system, every numbered swatch has a specific purpose:
#1 → Your dark text color (for light backgrounds)
#2 → Your light text color (for dark backgrounds)
#3 → Your accent color or low transparency background color
#4 → Your accent button / hover color
#5 → Your accent color for a specific offering (in the template’s case, a course page)
#6 → Your dark background color (and line colors)
#7 → Your neutral background color
#8 → Your main background color
This means that instead of guessing where to put your brand colors or accidentally making your body copy the same color as your background, you follow the guide, drop your colors into the correct spots, and instantly have a polished look.
And this isn’t just for colors. Every Northfolk Showit template comes with a brand guide page that includes:
- Your type styles (titles, headings, subheadings, paragraphs, etc.)
- The correct fonts for each style, with direct links to download or purchase other font licenses you might need
- Sometimes, even brand patterns and overlays to keep your site visually consistent.
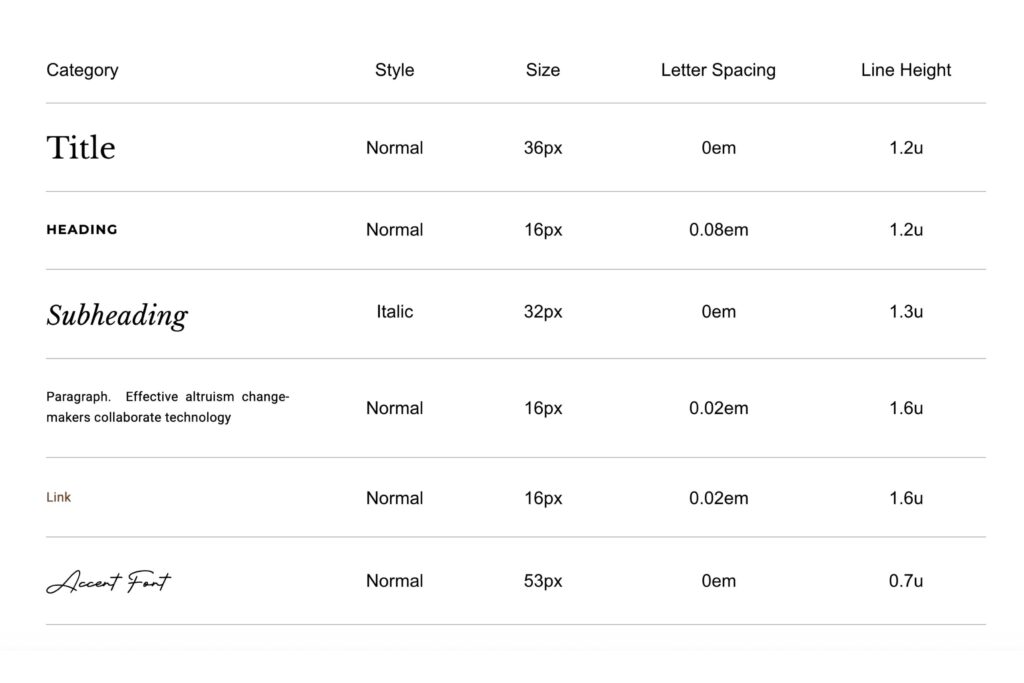
Here’s an example of Northfolk’s type styles system for their Heirloom template:
For non-designers, this Brand Guide is basically a built-in semi-custom brand kit. You just follow the guide and your site stays perfectly styled from page to page.
If you’re new to business and starting from scratch, it’s a lifesaver. But even if you already have an established brand, you’ll appreciate not having to manually update every color and font.
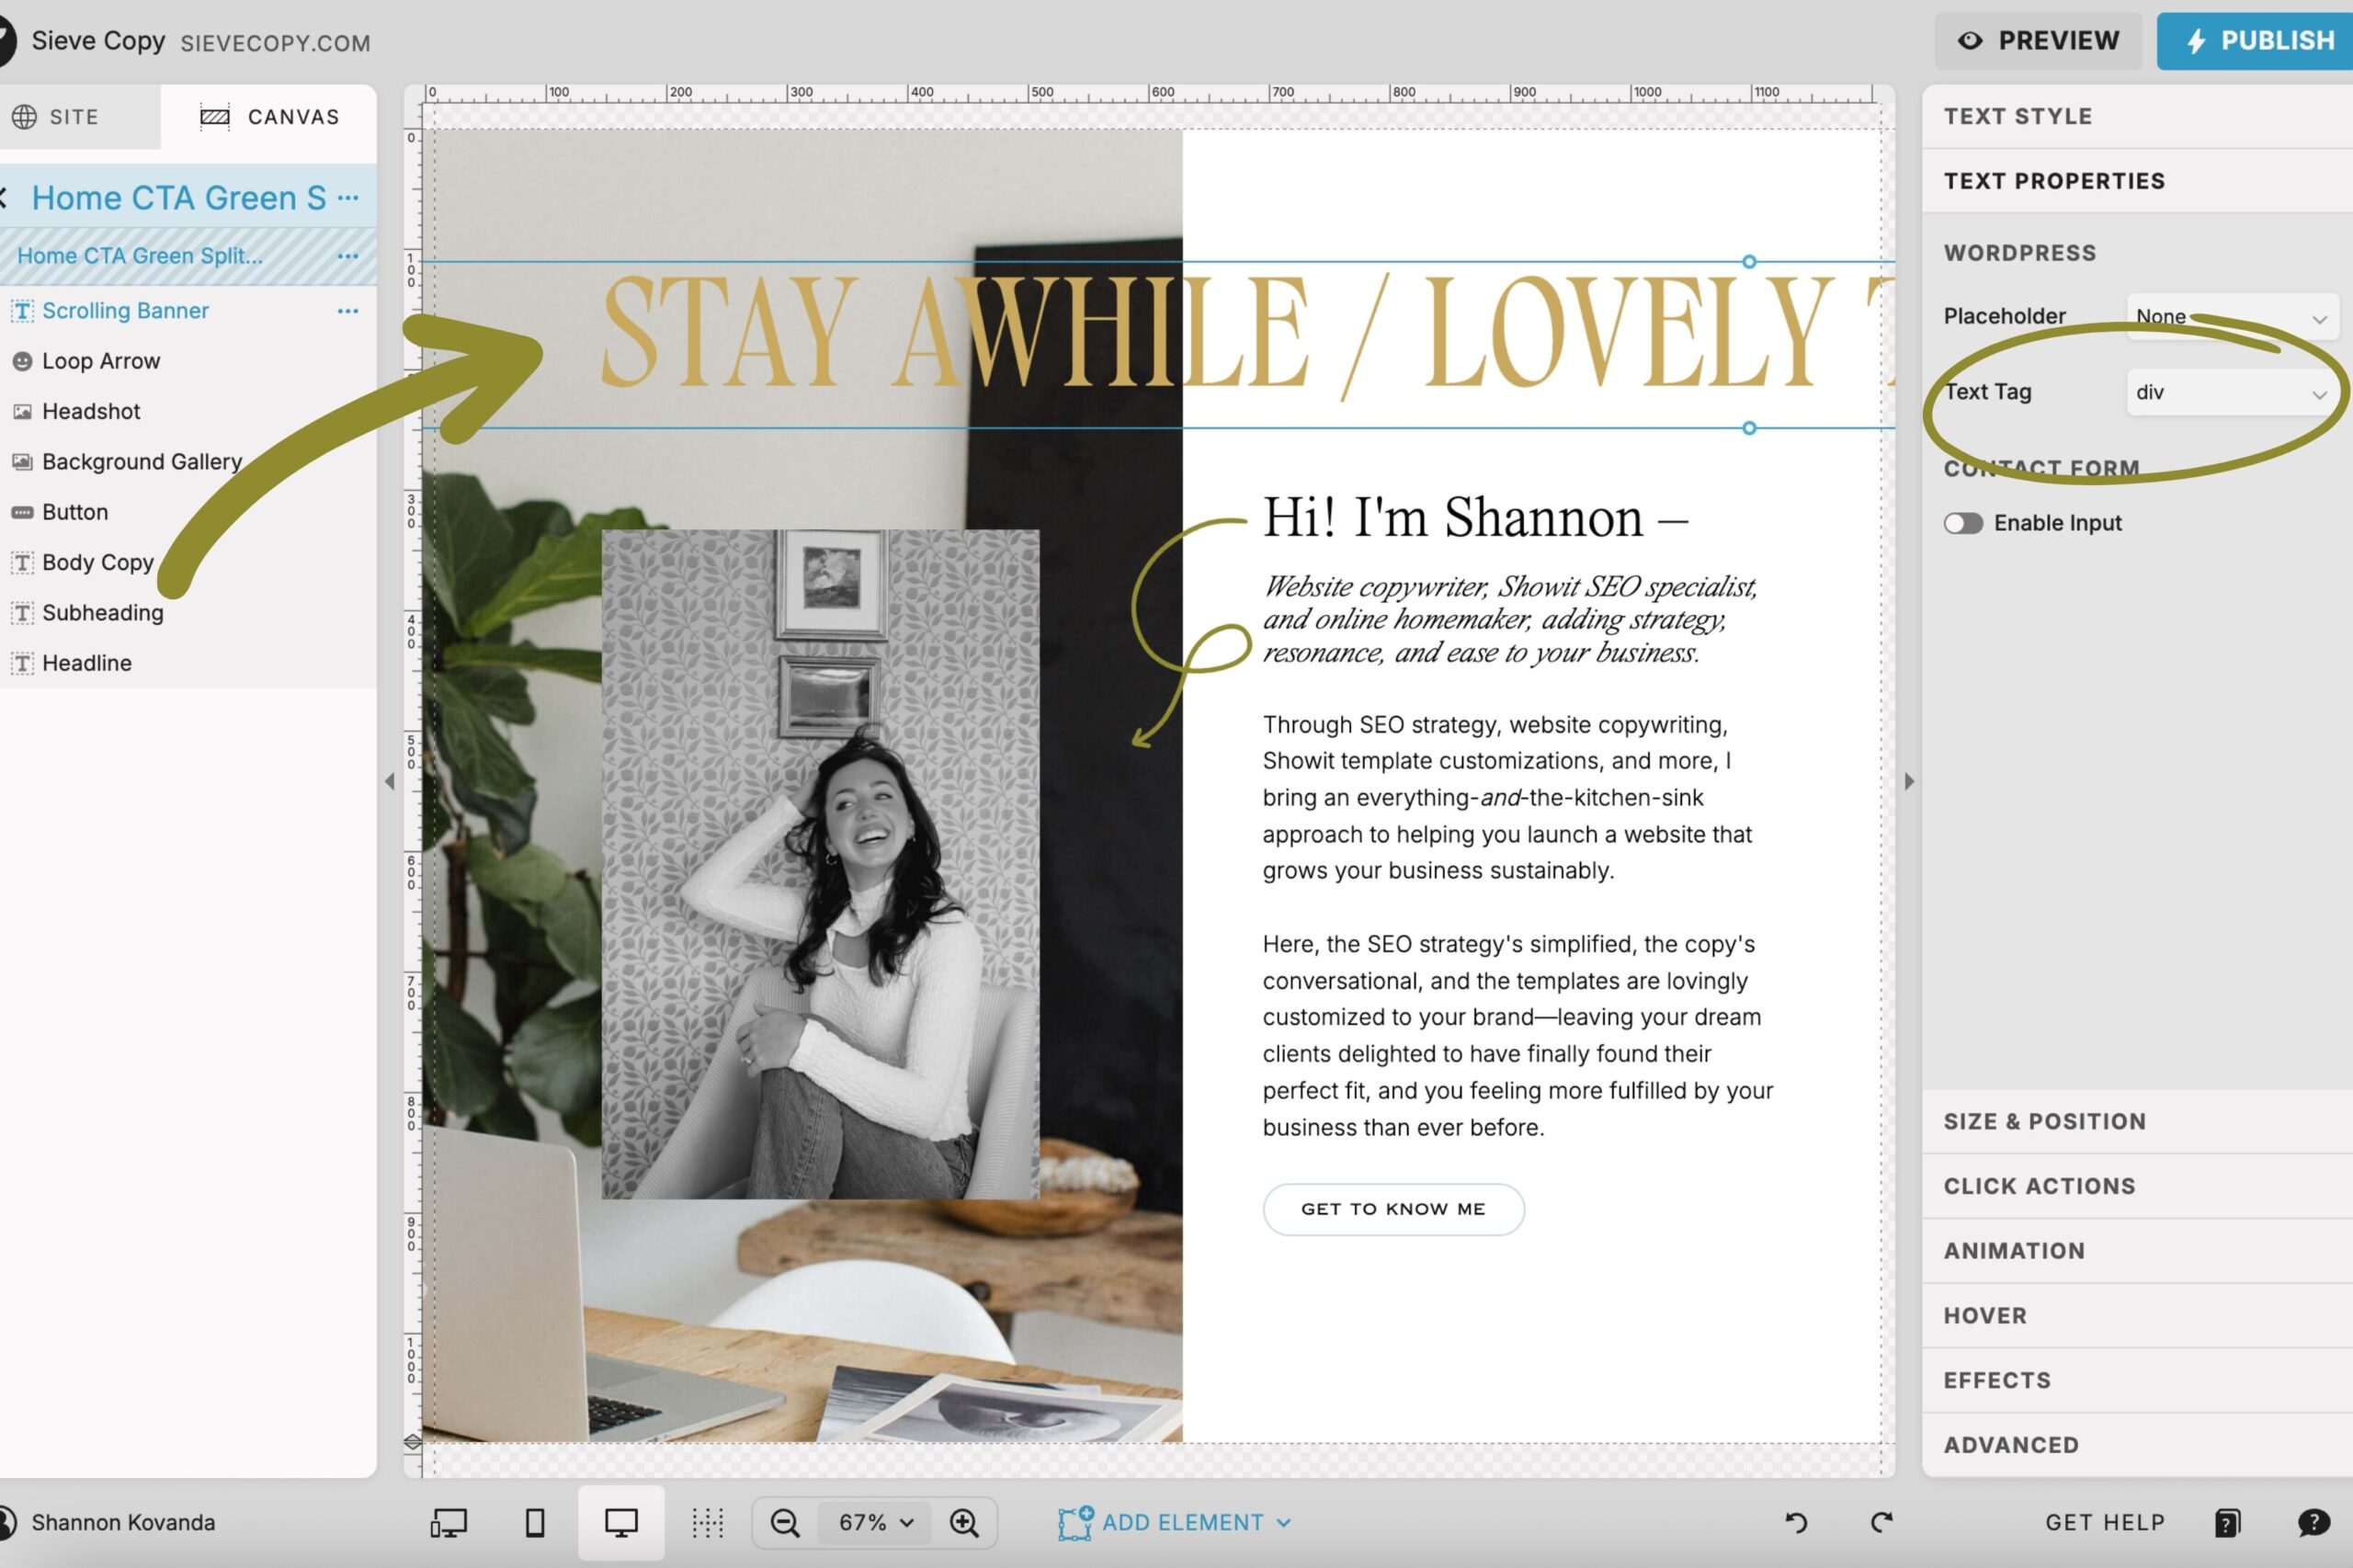
02. Proper Use of Text Tags
To translate, text tags are the HTML-code categories given to all the text and decorative elements on a website page. You’ve seen them before:
- h1
- h2
- h3
- p
- div
- nav
When you view a website, you can tell what is a headline versus a subheading versus body copy, etc., because of the way things look. The sizes vary and sometimes the fonts do, too.
But search engines can’t “see” websites. They read the code instead.
With Showit, you don’t have to worry about code (praise the Lord!). But you do need to make sure you assign the correct HTML text tag to every block of text on every page.
Because, yes. You can do it wrong. (And people often do.)
It sounds tech’y and annoying. (And it is.) But it matters.
I have a whole post about HTML text tags in Showit. But the good news is that Northfolk templates come with all the upfront work done for you.
If you use the template as intended, you can follow the copy prompts they’ve put in place to map out your own copy, ensuring the tags stay relevant throughout.
But regardless of how much you customize the template, I always recommend double-checking your text tags prior to publishing, especially since Showit auto-assigns a tag to each text element you add. But if you want to launch and get to it later, Northfolk’s templates have safeguards in place so you aren’t launching with one of the most common SEO mistakes plaguing your website.
(Dramatic? Kinda. But text tags *are* that big of a deal.)
03. No Hard-to-Find Broken Links
When I was customizing my first Showit template, I ran an audit in Ubersuggest that flagged several broken links on my website.
I’m a detailed person and triple-checked everything before publishing, so I was frustrated that so many errors slipped through the cracks.
…Until I noticed the broken links were mainly my headlines.
…Which I never would have thought to check, because people don’t intuitively click on headlines when browsing a website.
It turned out the template I used came with headlines linked to other template pages that no longer existed after my customizations.
This might not seem like a big deal, but too many broken links on your website can put up a red flag to Google, making it think you don’t keep your website up to date. In other words, Google won’t fully trust you. 😬
And if Google doesn’t trust you, Google doesn’t recommend you. 😬😬
Just like with text tags, I always recommend you thoroughly quality-check your website before going live. But if you’re testing links, you’re probably focused on buttons, underlined text, and maybe some images — not your headlines.
Northfolk templates come pre-audited, quadruple-checked, and completely organized, so you can be sure only the elements that look clickable are linked.
Because Northfolk has those earlier-mentioned guidelines in place when designing, potential issues like this one never even come up.
04. Hidden Canvases With Instructional Messages
Showit templates often include features implemented for demonstrative purposes, like newsletter signups, contact forms, countdown timers, etc. All of which require updating (or removing, if they don’t apply to your business) before going live.
But instead of hoping you remember to do so, Northfolk templates come with helpful hidden canvases, only visible from the back-end, that remind you action is needed before pressing ‘Publish.’
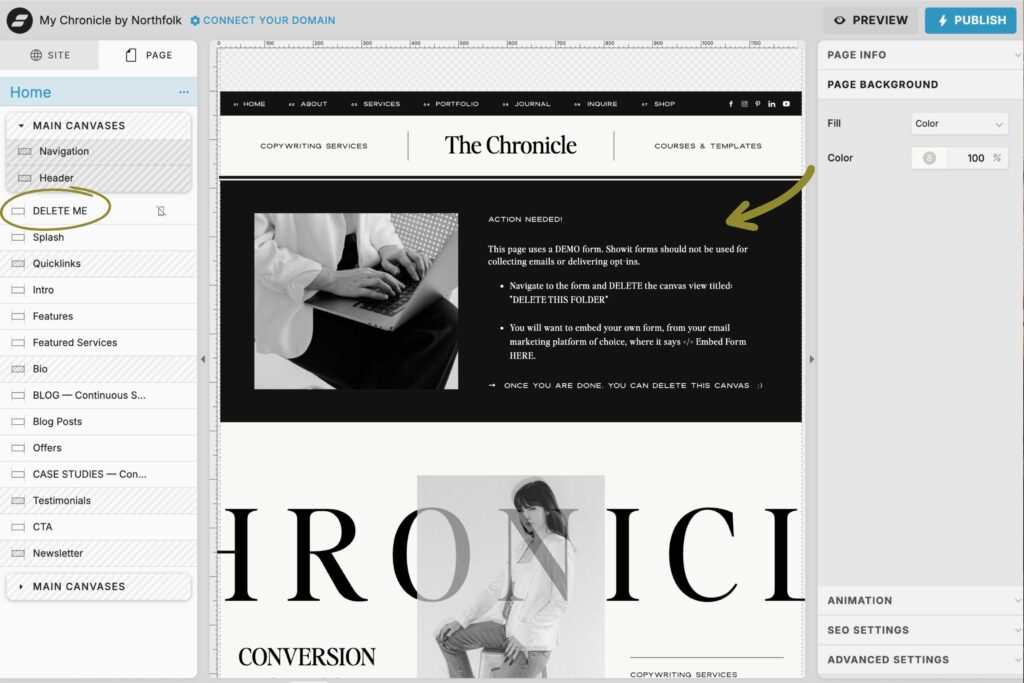
As a bonus, these canvases are labeled “DELETE ME” in all caps so you know exactly what to do after taking care of the update.
(Because P.S., hidden canvases still load in your website’s code – which Google reads — even though they aren’t visible on the front end. They also often include broken links and can increase your load times. So it’s best to delete them instead of just hiding them from view.)
05. Clean Layers Panels
In Showit, your layers panel is on the left-hand side of the back-end. It’s where all the pages and canvases of your website are housed.
Every canvas and every element within that canvas has a label. But it’s up to the Showit template designer to rename those canvases and elements in a way that’s helpful to the end user.
Oftentimes, they’re not custom-labeled, so they’re marked by whatever the copy says on the page.
As you update the template’s copy for your own, things become very hard to follow very quickly.
As someone who designs desktop first and mobile second, a disorganized layers panel with non-obvious naming conventions makes it incredibly cumbersome for me to polish the mobile version of a site.
Northfolk templates come with pristine layers panels. Each canvas and element is named in such a way that you know exactly what to click when you need to make an update. See an example from their Chronicle template below:
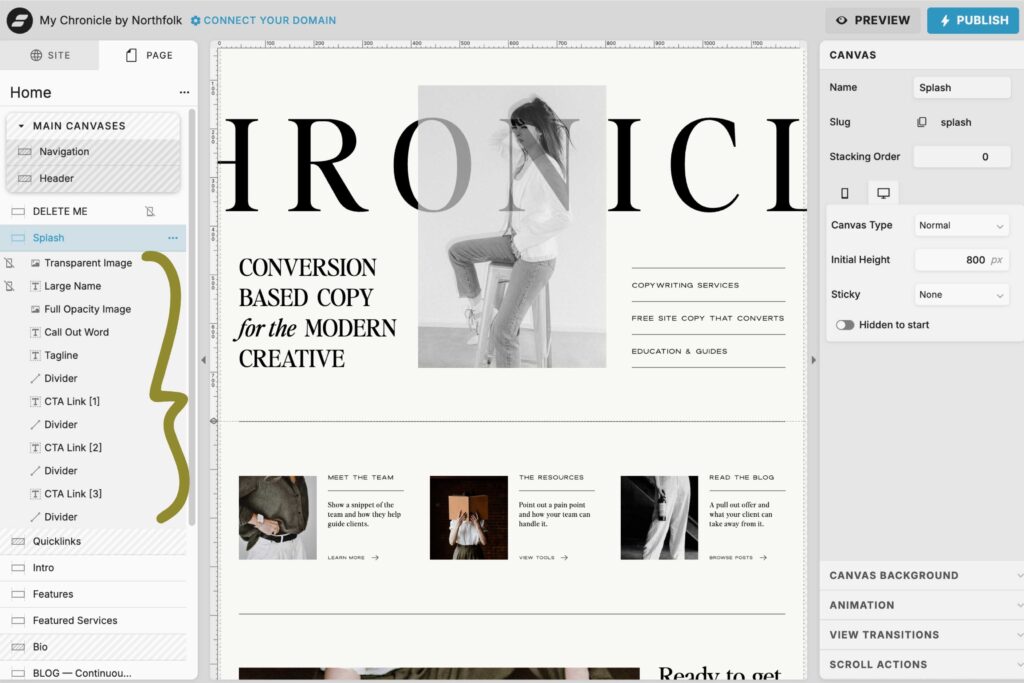
Clean, straightforward, and easy to edit.
*Adds to cart.*
Northfolk templates aren’t just beautiful. They’re functional. And built with SEO-friendly details that make your life easier.
Northfolk’s designs come with a thoughtful, organized, and error-free back-end setup that helps you optimize without having to learn all the tech’y nuances of Showit first.
Which means you can focus on styling the template to your own brand, inputting your images and copy, and going live.
And isn’t that the whole point of buying a Showit template in the first place?
If you’re ready to invest in a template that looks amazing and works smarter behind the scenes, save 15% on any Northfolk Showit template with code SIEVECOPY.
+ view the comments